


Introduction
In today's cloud-centric world, building and managing infrastructure in a reliable and scalable manner is essential. Terraform and AWS are powerful tools to achieve that. Terraform allows us to define infrastructure using code, while AWS provides a comprehensive set of cloud services. Combining Terraform and AWS enables automated provisioning, version control, and easy replication of infrastructure. With Terraform, we can manage various AWS resources efficiently, allowing developers to focus on application development. In this blog post, we will focus on creating an Amazon Web Services (AWS) Virtual Private Cloud (VPC) using Terraform. We will explore the key concepts and step-by-step instructions to help you get started with creating a VPC using Terraform.
Step 1: Connect to an existing EC2 instance using SSH
We would be connecting to an existing EC2 instance via SSH using the step-by-step guide in the post here. If you do not have an EC2 instance already created, you can also follow the guide here to create one.
Step 2: Install Terraform on the EC2 instance
Terraform is an open-source project maintained by HashiCorp for building, changing, and combining infrastructure safely and efficiently. Some of the benefits of using Terraform to provision and manage infrastructure include:
Version-controlled infrastructure as code
Multi-cloud support with over 100 providers including Amazon Web Services, Microsoft Azure, and Google Cloud Platform
Separate plan and apply stages so you can verify changes to your infrastructure before they happen
A public registry of modules that makes provisioning common groups of resources easy.
HashiCorp also provides enterprise versions of Terraform that provide additional features for collaboration, infrastructure policy, and governance. The enterprise versions are built on top of the open-source version.
In this guide, we will install Terraform on a Linux virtual machine. HashiCorp releases individual Terraform binaries making the installation process a breeze.
- Download a release package:
wget https://releases.hashicorp.com/terraform/1.0.1/terraform_1.0.1_linux_amd64.zip
This guide uses version 1.0.1 of Terraform to ensure consistent behaviour even as newer versions are released. The most recent version of Terraform for all platforms can be found on Terraform's downloads page.
- Extract the zip archive containing the Terraform binary to the
/usr/local/bindirectory:
sudo unzip terraform_1.0.1_linux_amd64.zip -d /usr/local/bin/
/usr/local/bin is included in the PATH environment variable allowing you to run terraform from any directory.
Remove the release package:
rm terraform_1.0.1_linux_amd64.zipConfirm Terraform version 1.0.1 is installed:
terraform version
Step 3: Configuring Providers in Terraform
Terraform uses a plugin architecture to manage all of the resource providers that it supports. No providers are included when you first install Terraform. You declare which providers you need to use in a configuration file. Terraform configuration files have a .tf file extension. The configuration is written using HashiCorp Configuration Language (HCL). HCL attempts to strike a balance between human- and machine-readability. JavaScript Object Notation (JSON) can also be used but is discouraged because it is less human-readable and doesn't support commenting.
Terraform includes an initialization command that reads the providers in a configuration and downloads the appropriate provider plugin. You will see how all of this works.
- Make a directory for organizing your Terraform configuration, and change into it:
mkdir infra && cd infra
- Create a Terraform configuration file declaring the AWS provider:
cat > main.tf <<EOF
terraform {
  required_providers {
    aws = {
      source  = "hashicorp/aws"
      version = "3.48.0"
    }
  }
}
provider "aws" {
  region = "us-west-2" # Oregon
}
EOF
The configuration file contents are wrapped between the EOF delimiters. Each block is defined using curly braces { }. Take note of the following aspects of the configuration:
The terraform block contains a required_providers object with aws defined.
The source location defines the address of the provider you intend to use.
The version constraint defines the specific provider version.
The provider keyword is followed by the name of the provider you want to use.
The name aws is a string and all strings must be enclosed in double-quotes in HCL.
Argument values are assigned using an equal sign =.
Any text following a # is a comment
The region is the only required argument for the aws provider. An example of an optional argument for the AWS provider is access_key and secret_key credentials. Because you are using an EC2 instance to run Terraform, Terraform can use the IAM instance profile to authenticate any requests to AWS.
Initialize the working directory by running the init command:
terraform initIn addition to downloading referenced providers, the init command downloads any referenced modules from the Terraform registry when modules are included in the configuration.
List all of the directories to see what the init command has created:
ls -AThe .terraform directory stores the downloaded AWS provider plugin in .terraform/providers/registry.terraform.io/hashicorp
aws/3.48.0/linux_amd64/:
The .terraform directory will also store any other data terraform needs later on for managing your infrastructure.
Step 4: Creating AWS resource in Terraform
The AWS Terraform provider allows you to manage resources in AWS. You can create resources provided by a provider by adding resource blocks to Terraform configuration files. The syntax of a resource block resembles the following:
resource "resource_type" "identifier" {
  argument1 = value1
  argument2 = value2
}
The resource_type is a type of resource provided by the provider. The name of the provider of the resource type is always the first part and is a string type. For example, AWS resources all have types beginning with aws_. A list of all supported resource types for the AWS provider is available in the sidebar of the AWS provider page. The identifier is used within Terraform to identify the resource.
To demonstrate how to create a resource with the AWS provider, we will create an Amazon Virtual Private Cloud (VPC) resource using Terraform.
cat >> main.tf <<EOF
resource "aws_vpc" "web_vpc" {
  cidr_block = "192.168.100.0/24"
  enable_dns_hostnames = true
  tags = {
    Name = "Web VPC"
  }
}
EOF
The cidr_block is the only required argument for an aws_vpc resource.
The enable_dns_hostnames and tags arguments are both optional and demonstrate a boolean value (true), and a mapping that includes the Name key.
The full list of arguments for the aws_vpc resource type is provided on the resource's information page.
- Issue the apply command to have Terraform generate a plan that you can review before actually applying:
terraform apply
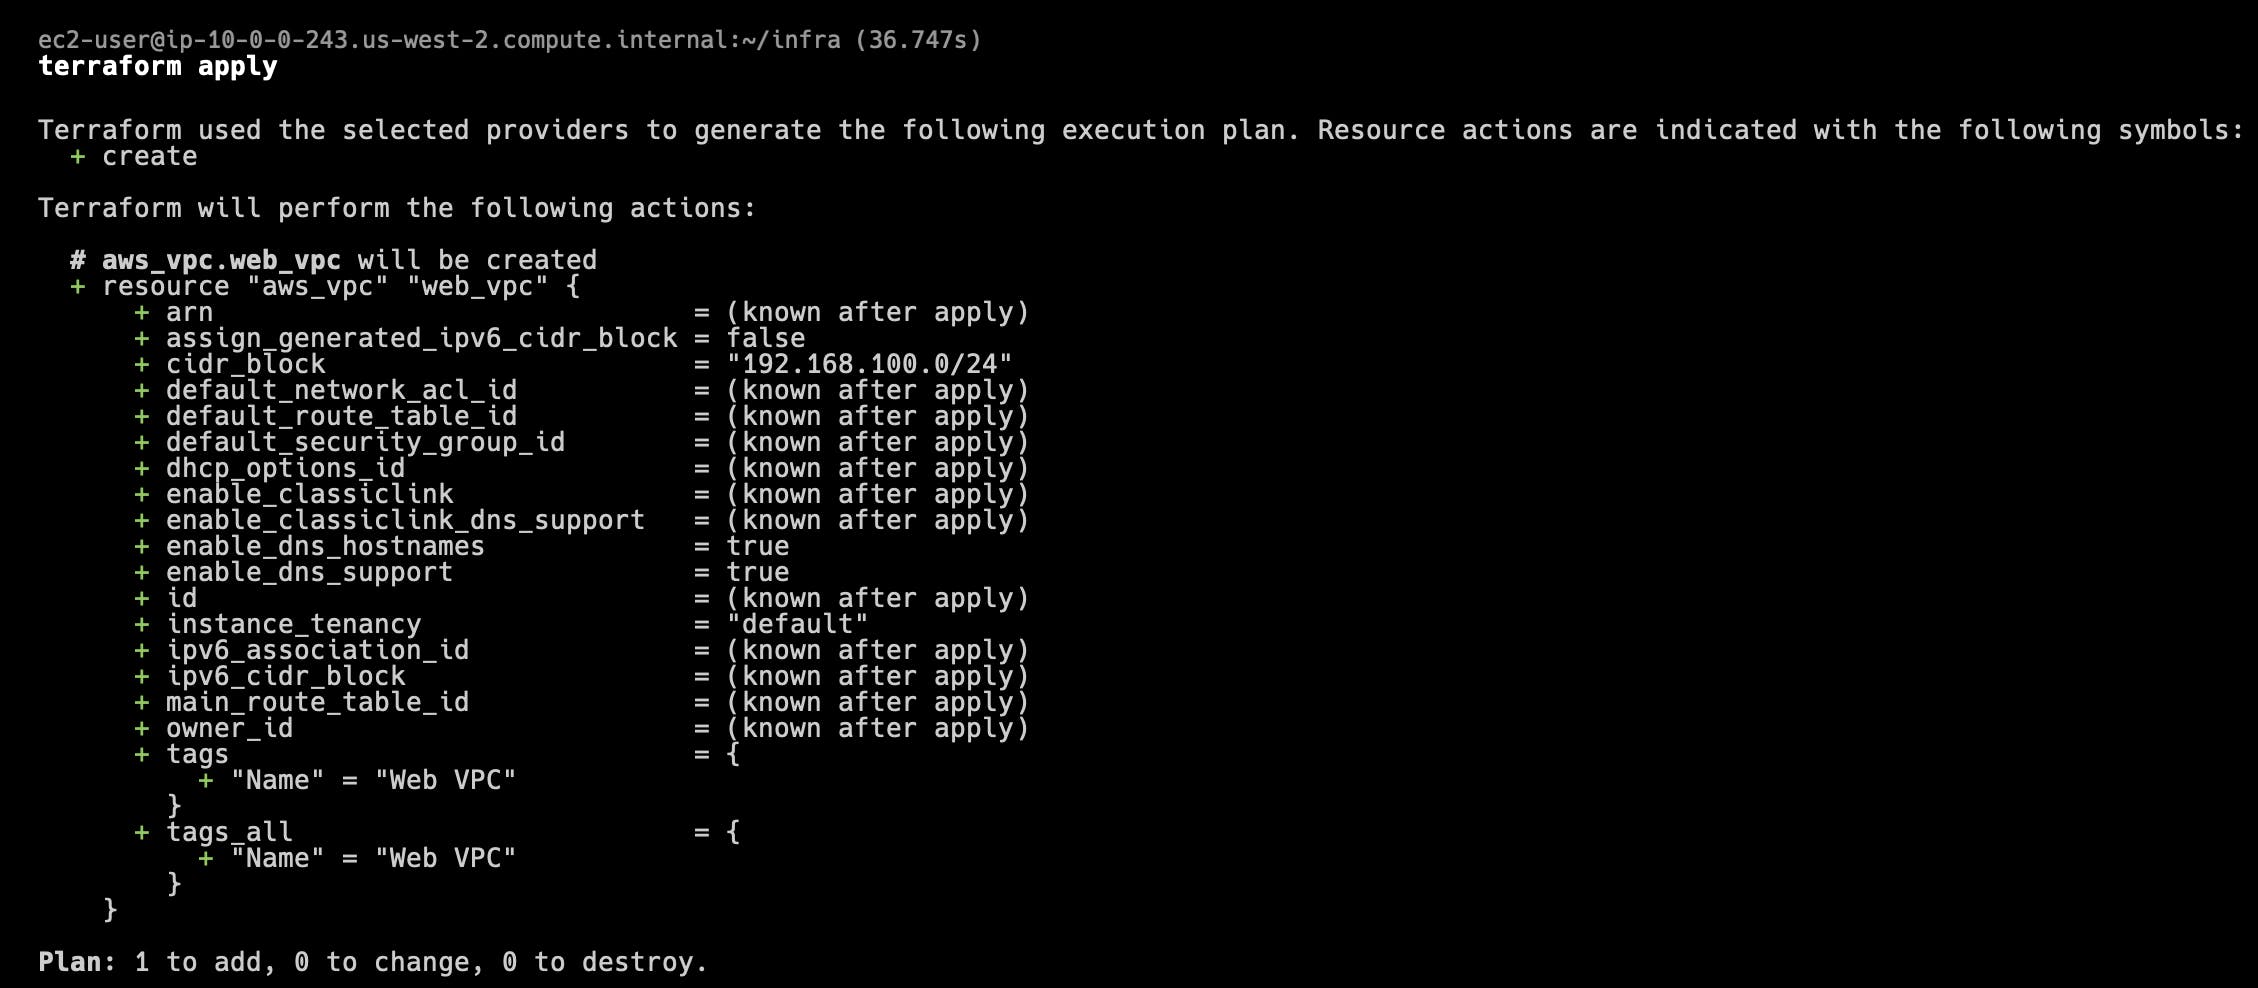
The Terraform plan is output and indicates the number of resources to add, change, or destroy. The plan details use the following symbols for each type of action:
+: Add
-: Destroy
~: Change
The + aws_vpc.web_vpc action lists all of the attributes of the resource. The resource attributes are values that you can reference after the resource is created. Some values are known in advance because you specified them as arguments to the resource, or because they have default values, such as enable_dns_support. The values that are known after the resource is created are given the placeholder value of <computed>.
- Accept and apply the execution plan by entering yes at the prompt.
The following confirmation output is displayed:
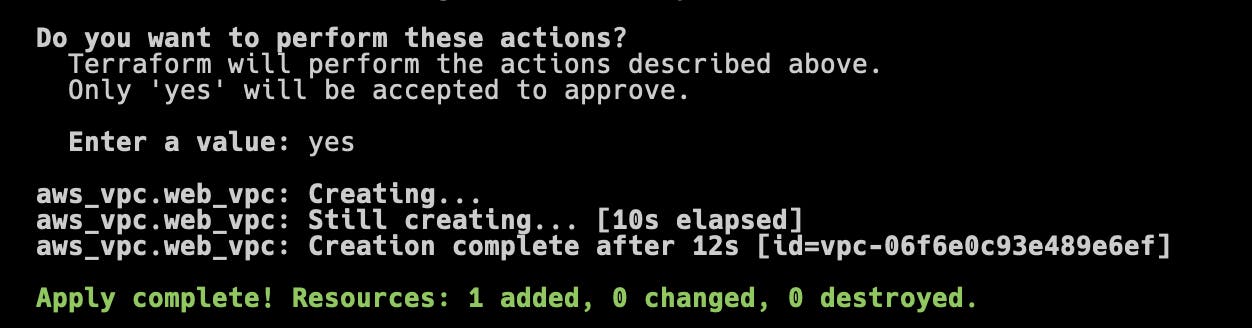
After the command completes, the ID of the VPC is also given in parentheses.
- Use the AWS command-line interface (CLI) to confirm that the VPC has been created with the arguments you specified:
aws ec2 describe-vpcs --region us-west-2 --filter "Name=tag:Name,Values=Web VPC"
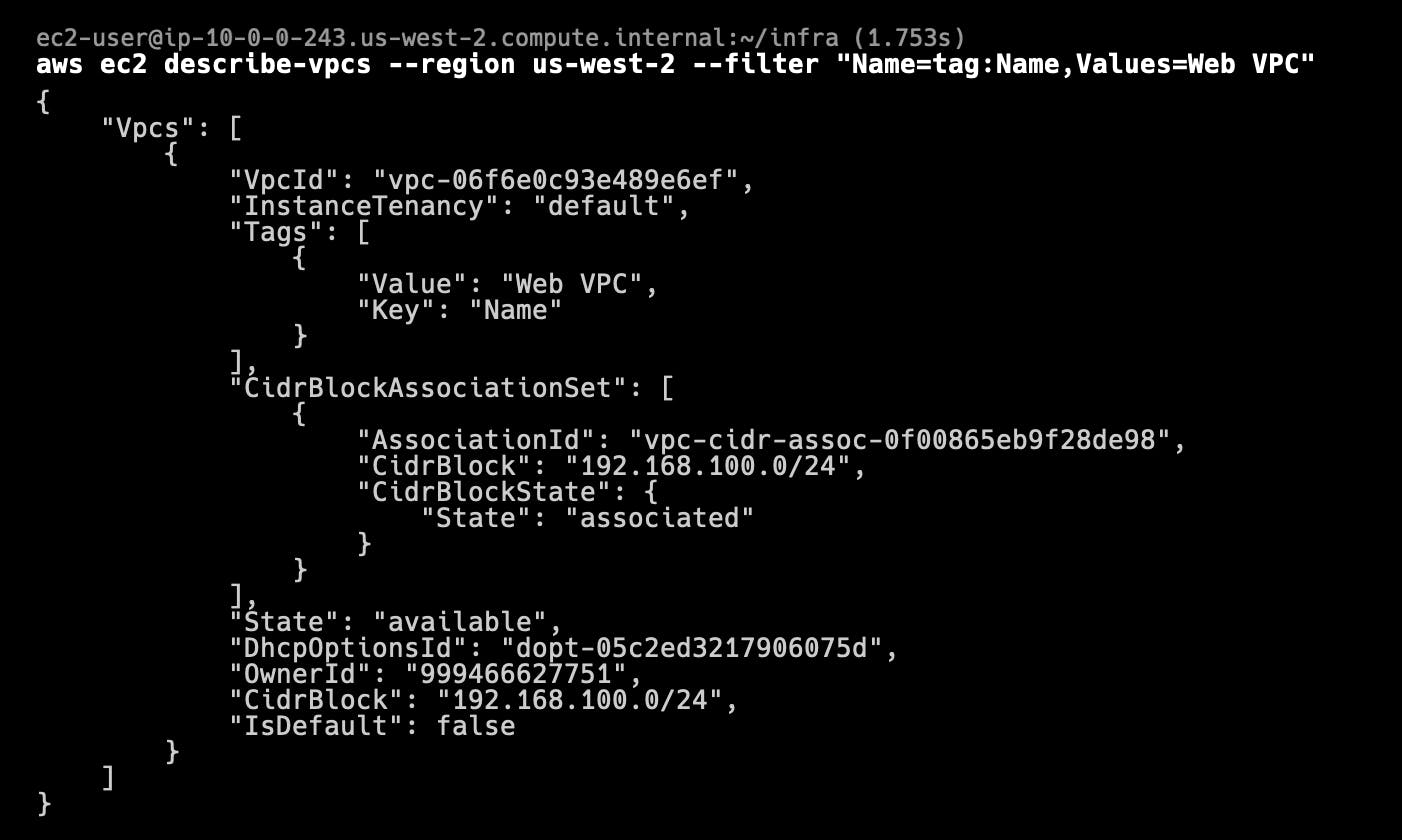
The AWS CLI describe-vpcs command you entered lists all of the VPCs in the us-west-2 region with a Name tag that has a value of Web VPC. You can confirm that the Name tag has a Value of Web VPC, and the CidrBlock is 192.168.100.0/24.
Enter the following command to determine if DNS hostnames support is enabled for the VPC:
aws ec2 describe-vpc-attribute --region us-west-2 --attribute enableDnsHostnames --vpc-id <VPC_ID>where you should replace <VPC_ID> with the value of the VpcId property in the output of the previous command. The value will resemble vpc-xxxx1234. The output confirms that the DNS hostname support has been enabled as you specified in the Terraform configuration:

Conclusion
In this blog post, we explored the powerful combination of Terraform and AWS for building and managing infrastructure in the cloud. Terraform provides the ability to define infrastructure using code, while AWS offers a wide range of cloud services. By leveraging Terraform and AWS together, developers can automate infrastructure provisioning, benefit from version control, and easily replicate infrastructure setups.
Specifically, we focused on creating an AWS Virtual Private Cloud (VPC) using Terraform. We discussed the key concepts and provided step-by-step instructions to help you get started. By following the guide, you learned how to connect to an existing EC2 instance via SSH, install Terraform on the instance, configure providers in Terraform, and create AWS resources, such as an AWS VPC.
With Terraform, you can efficiently manage various AWS resources, allowing developers to concentrate on application development rather than infrastructure setup. The ability to define infrastructure as code brings benefits like version-controlled configurations and easy replication of infrastructure setups across different environments.
By combining Terraform's declarative syntax and AWS's vast set of cloud services, you can achieve reliable, scalable, and easily manageable infrastructure in the cloud. With the knowledge gained from this guide, you are well-equipped to continue exploring and leveraging the power of Terraform and AWS for your infrastructure needs.